
Top Tips for Capturing the Perfect Image for Your ArtPix 3D Project
Are you ready to elevate your ArtPix 3D project from ordinary to extraordinary? Whether you’re a seasoned artist or just starting out, capturing the perfect image is crucial for showcasing your creativity in stunning detail. In today’s digital age, where visuals reign supreme, understanding how to highlight the intricacies of your work can make all the difference. Join us as we unveil our top tips for snapping that flawless shot—one that not only does justice to your masterpiece but also captivates and inspires viewers. Grab your camera and let’s dive into the art of photography that will take your ArtPix 3D projects to new heights!
Importance of choosing the perfect image for your ArtPix 3D project
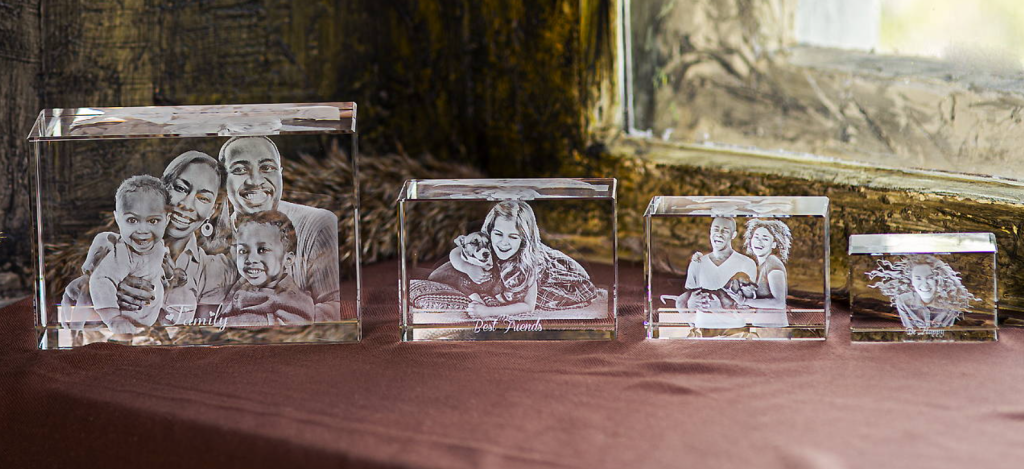
Choosing the perfect image for your ArtPix 3D project is crucial. It sets the tone and emotion of your final piece. The right image can evoke memories, tell a story, or highlight significant moments in life. A well-chosen picture enhances the depth and detail that ArtPix 3D offers through its engraving services. Vibrant images translate into stunning three-dimensional art pieces that capture attention. Conversely, a poor choice can diminish the overall impact. Dull images may lose their essence when translated into 3D form, leading to disappointment upon arrival. Investing time in selecting an ideal image ensures you preserve cherished memories beautifully. It’s about creating something unique that resonates with you or those who will receive it as a gift. Every detail counts when transforming photos into custom engravings at ArtPix 3D—make yours unforgettable!
Consider the subject matter and composition
When selecting an image for your ArtPix 3D project, the subject matter is crucial. Think about what story you want to tell or the emotions you aim to evoke. Personal moments, cherished memories, or breathtaking landscapes can add depth and significance. Composition also plays a vital role. A well-composed image guides the viewer’s eye smoothly across the piece. Consider elements like balance, symmetry, and focal points. You want your main subject to stand out while maintaining visual interest throughout. Experiment with angles too! Sometimes a simple shift in perspective can elevate an ordinary shot into something extraordinary. Look for unique viewpoints that reveal hidden details or create dynamic tension. Lastly, remember that simplicity often shines brightest in engraving projects. A clean background allows your chosen subject to take center stage without distractions grabbing attention away from it.
Pay attention to lighting and contrast

Lighting plays a crucial role in photography. It can make or break your image, especially for an ArtPix 3D project. Natural light is often the best option. Aim to capture images during golden hours—just after sunrise or just before sunset—to achieve warm tones and soft shadows. If you’re shooting indoors, consider using diffused artificial lights to reduce harsh shadows. Experiment with different angles to see how lighting affects your subject. Contrast adds depth and interest to your image. A well-lit photo will highlight details while dark areas create intrigue. Adjusting contrast levels during editing can enhance textures and emphasize key features that matter most in engraving. Remember, striking the right balance between light and shadow is essential for making your chosen image stand out beautifully when transformed into a 3D piece.
Use high-resolution images
When it comes to creating stunning engravings with ArtPix 3D, the quality of your image matters immensely. High-resolution images ensure that every detail is captured beautifully in your final product. Low-quality pictures can result in blurred or pixelated outcomes. This diminishes the visual appeal and clarity of your artwork. A crisp, clear image provides a solid foundation for an unforgettable engraving experience. Look for images with at least 300 DPI (dots per inch). This resolution level guarantees fine details are preserved when transferred into 3D form. Additionally, high-resolution files allow you more flexibility during editing without sacrificing quality. You can adjust elements confidently knowing they will still look sharp on your finished piece. Investing time in selecting a high-res image pays off when you unveil your custom engraving. It transforms memories into art that truly stands out.
Avoid copyright infringement
When selecting an image for your ArtPix 3D project, it’s crucial to navigate the complex waters of copyright. Using copyrighted images without permission can lead to serious legal consequences. Always opt for images that you own or have explicit rights to use. This includes photos you’ve taken yourself or those acquired through stock photo websites that offer licenses. Creative Commons is also a great resource; just ensure you understand the specific licensing requirements. If you’re inspired by someone else’s work, consider reaching out for permission. Many artists appreciate being asked and may grant usage rights. Taking these precautions not only protects you legally but also supports original creators in their craft. So, always choose wisely when it comes to sourcing your visuals!
Ways to enhance your chosen image for a better result
Enhancing your image can make a world of difference in the final outcome. Start by adjusting brightness and saturation levels. A little tweak can help certain features pop, making your subject stand out more vividly. Removing distracting elements or backgrounds is another effective technique. A clean focus on the main subject directs viewers’ attention exactly where you want it. Cropping or resizing the image plays a crucial role as well. By framing your subject better, you enhance its visual appeal and ensure that it fits perfectly within ArtPix 3D’s specifications. Consider using filters or effects sparingly to add an artistic flair without overwhelming the original essence of the photo. These enhancements should complement rather than dominate your chosen image, creating a stunning result that captures emotion beautifully.
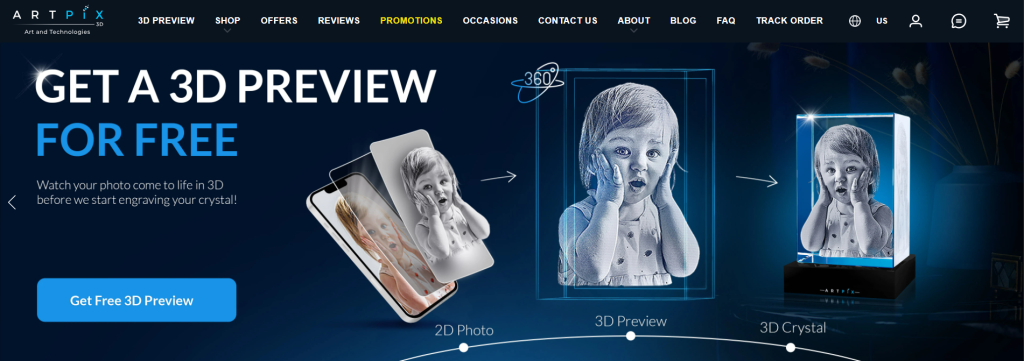
How to upload and preview your image on ArtPix 3D’s website
Uploading your image to ArtPix 3D is a straightforward process. Begin by navigating to their user-friendly website. Look for the “Upload Your Image” button prominently displayed on the homepage. Once you click it, you’ll be prompted to choose an image from your device. Make sure it meets the specifications outlined earlier—high-resolution images work best for engraving. After selecting your file, take a moment to preview how it looks in their template. This step is crucial as it allows you to visualize how your final piece will appear after engraving. If needed, make adjustments directly through their editing tools before proceeding with your order. You can zoom in or out and reposition the picture until you’re satisfied with its placement. This interactive feature ensures that each customer has complete control over their design project before finalizing anything!